| Kombucha Home |
Kombucha History| Kombucha Skin Care | Kombucha Band-Aid | Kombucha for Pets | Kombucha FAQ | Where to get Kombucha | My personal experience | How to make Kombucha Tea | Kombucha Health Benefits | Kombucha Studies
How to make Kombucha Tea
I am repeating myself in every Kombucha article and I'll repeat it once again - the secret of 'How to Make Kombucha Tea' is to follow a few simple rules!
Kombucha Recipe Step by Step
Here it comes, Recipe Step by Step in pictures and words:
1. STEP
Gather all the necessary ingredients and Things You'll Need:
- Pot
- Electric water heater (optional)
- Tea
- Sugar
- Empty jar
- SCOBY
- Cloth,
- Rubber Band
- Funnel
- Jug or Bottle
2. STEP
Wash your hands! Do not use (antibacterial) soap as it can contaminate the Kombucha and destroy the bacteria culture.
I use apple cider vinegar or plain vinegar or bicabornate of soda to wash hands and any other materials you will be using is a good substitute for antibacterial soaps. Use of non-latex gloves is also recommended, especially if touching the culture directly.
3. STEP
Boil water (3 liters) in electric water hater or in a pot (and put the stove to high).
Use fresh water with no or not too much of chlorine, if possible use water which does not contain too much limescale (so called soft water) - best are distilled or filtered water.
4. STEP
Boil water for at least 5 minutes to destroy all possible bacteria and microorganism.
5. STEP
Add about 3-5 tea bags (depending on the tea quality) and wait for 10-15 minutes.
Pour boiled water into a pot made of glass, stainless pot, porcelain or plastic (the one made of glass is certainly better option due to the microorganism that can be found on plastic container, which can interfere with the culture and even kill her). Most important - do not use pot made of metal, because culture can react with metal (see Kombucha can kill you Myth).
Add 3-5 bags of tea - the best is combination of green and black tea with some rose hip tea. You can also you use other combinations and try to experiment with different flavours: chamomile, puerh (sort of black tea), combination of mixed fruit tea. You should never use herbal tea as sage, thyme, mint, wormwood, centaury, yarrow,...
Wait for 10 - 15 minutes, which is longer than usual when you making your favourite tea, but remember - this time you are not making it for yourself but for your Mushroom. the reason why you should wait longer is because longer you leave tea in hot water, more nitrogen will be released. Nitrogen released from tea is this Culture's food!
6. STEP
Add sugar.
You should add app. 100 grams of sugar per 1 Liter of tea. You can add less sugar if you want your tea to be more sour, or simply brew it another day or two and you should get same effect as your culture will eat more sugar. And remember - you should use white sugar, no brown or other kind of fancy healthy sugar is good for your mushroom.
7. STEP
Cover and let tea sit until it is room temperature, around 75ºF/24ºC will do.
It will seem to take a long time to cool, but adding the culture when the water is too hot will kill it. I usually maka a tea in the morning, before I go to work, and in the afternoon is certainly ready. Otherwise you should wait for about 2-3 hours for your tea to cool down. You can speed the process if you put it to the fridge, but I don't believe your fridge will be really happy about it.
8. STEP
Wash the jar! Be precise, use very hot water, rinse it thoroughly!
Again, try to avoid any kind of antibaceterial soap, instead use bicarbonate of soda. Rinse out jar, cover, and wait
9. STEP
When the tea is cool, pour it into the glass jar and add the starter tea, which should constitute about 10% of the liquid.
Using about a 1/4 cup of vinegar per 3 liters of tea also works. This keeps the pH low to prevent any foreign molds or yeast from growing while the tea is getting started. To make sure it's acidic enough, measure the pH (this is optional). It should be below 4.6 pH. If not, keep adding starter tea, vinegar or citric acid (not Vitamin C; that's too weak) until the desired pH is reached.
10. STEP
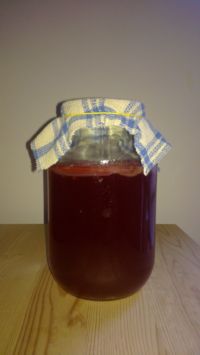
Put the SCOBY into the tea (with clean hands!), cover the top of the jar with the cloth, and secure it tightly with rubber band.
11. STEP
Put the jar in a dark place and dons move if for the following 8-12 days. Room temperature should be at least 12ºC up to 30ºC.
the best temperature is 21ºC or 70ºF to 30ºC or about 86ºF is best if you can manage. Lower temperatures will make it grow slowly, but below 21ºC or 70ºF makes it more likely that unwanted organisms will start growing too.
12. STEP
Wait for 8 - 12 days.
Depending on your taste (sweet or sour) you should let your Kombucha Tea to brew for about 8-12 days - the longer the period the less sweet the tea.
When the tea starts to get smelly like vinegar, you can start tasting it and checking pH levels.
During the process the culture will sink or float or do something in between. It is better that the mushroom floats on top to block aspergillus contamination. If your culture sinks - don't worry. Leave it over the night and if it won't come up, you should help her with a wooden stick. Mushroom has to be at the surface as it needs to get some fresh air. You can also try to bribe her by putting some sugar under the culture.
The best way to pull a sample is with a straw. Don't drink directly from the straw, as backwash may contaminate the tea. Also, do not dip the test strip into the brewing vessel. Instead, dip the straw about halfway into the tea, cover the end with your finger, pull the straw out and drink the liquid inside or put that liquid on the test strip.
If the kombucha tastes very sweet, it probably needs more time for the culture to consume the sugar.
A pH of 3 tells you that the brewing cycle is complete and the tea is at the correct point to drink. Of course this can vary a bit to suit your needs and taste. If this final pH is too high, then either the tea will need a few more days to complete the brewing cycle, or it should be chucked.
13. STEP
Gently remove mama and baby cultures with clean hands (and non-latex gloves if you have them) and set them in a clean bowl.
Note that they may be stuck together. Pour a little of the kombucha on them and cover the bowl to keep them protected. You can also wash them with water (room temperature) because there could be some 'dirt' around them. This is nothing to worry about - just some waste coming from the whole process.
14. STEP
Using the funnel, pour most of your finished tea into storage container(s).
Optionally, fill it all the way to the top. If you do not, then it will take forever to get fizzy. If there isn't enough, you can either get smaller containers - Or, if there's just a slight gap, fill the rest with juice or more tea.
Leave about 10% of old tea in the glass jar as starter tea to start a new batch of kombucha. Begin the cycle again: Pour in freshly brewed tea, put the culture back in, cover, etc.
You may use each layer of culture to make a new batch of tea; some recommend using the new layer of culture and discarding the old one. It is not necessary to put both layers of culture back into a single new batch; one will suffice. Also I tried splitting one kombucha culture in a few pieces and all of them survived and started making new kombucha babies - I had to help them with a wooden straw to protect them from sinking, but they survived!
Every fermentation cycle creates a new child from the mother. So once you have fermented your first batch you will now have two mothers, one from the original mother, and one from the new child. This multiplication will occur for every subsequent fermentation.
15. STEP
Cap your jug or bottles of finished kombucha (loosely for safety, tightly for carbonation) and let sit for about 2 - 5 days at room temperature.
16. STEP
Keep it in the fridge.
Kombucha is best enjoyed cold.
Cheers!
Enjoy!
Have A Great Experience/Story About This Topic?
Did you have a great experience with this topic? Would you like to share an interesting story/research?
